Saturday, June 30, 2012

DIY Americana Wreath

Somehow the first half of the year completely flew by. Not sure how that happened. I realized this past week that July 4th was coming up quickly and I had wanted to decorate for it this year. Well, with only 4 days to go, it didn't make sense to go all out or spend a lot of money. 

So I hit up Michael's and obtained some crafty supplies. The benefit of waiting to get July 4th things until July is that the stores apparently put it all on clearance. In fact, when I asked about red garland, I was told to check the Christmas aisle, which they were just setting up. 


Supplies: 
Grapevine wreath $5
Red and white flowers $3.50 each
Flag $1
Burlap garland $5
Rit Tan fabric dye $2

Always check Michael's for online coupons. While I was waiting in line I pulled up a 40% off a single item coupon and a 15% off entire purchase coupon on my phone so I spent even less.

Since I wanted a more vintage look I soaked the flag in the dye for about 40 minutes. Perhaps tea would work just as well, but the fabric dye did the trick.

While that was soaking, I cut and fashioned a large bow out of the burlap garland, and then wove the flowers into the grapevine. The bow is held together with some strategically placed elastic bands that are hidden by the middle loop and then attached to the wreath with a safety pin and twist tie. Why? I didn't want to mess with a glue gun. 


Once the flag was "aged" to my liking, I arranged it on the wreath. I sawed off the long part of the stick with a hand saw. This extra stick is actually now supporting the convex fold of the flag. I also sprayed a little fabric starch onto the flag to stiffen it up. Since I didn't use any glue in this project I was able to tie a ribbon to the top and hang it up straight away. I feel like it needs a little blue - maybe a few stars - around the bow, but I'm worried that would be too much. Thoughts? 


Happy Independence Day!


Sunday, June 17, 2012

Spicy Eggplant Lasagna!

I love lasagna, but the traditional version is not exactly diet friendly. So here is my "healthified" version, which I like even better!


Ingredients:
* 1 eggplant, sliced into thin circles
* 1 zucchini, sliced into thin ribbons
* 1 package of mushrooms
* 1 large jar of pasta sauce (I like the extra veggie kind)
* 1 cup low fat ricotta cheese
* 1 cup low fat cottage cheese
* 1/2 cup parmesan cheese
* Low fat provolone cheese slices
* Minced garlic or garlic powder
* 1 egg white
* 1 lb Italian Jennie-O lean ground turkey
* 1/4 tsp red pepper flakes
* Whole wheat lasagna noodles
* 1 bunch kale or rabe


Directions:
1. Preheat oven to 350F
2. Boil pot of water. Add rabe/kale to water and blanch for 4 min. Pour into strainer and run under cold water. Once cool, chop into 1" pieces.
3. Brown turkey in skillet with red pepper flakes.
4. Add kale to turkey and cook for 2-3 minutes.
5. Blend cottage cheese, ricotta cheese, 2 tbsp parmesan, garlic, and egg white. I use my Magic Bullet.
6. Coat baking dish with spray.
7. In the dish, layer:
    * Sauce
    * Eggplant slices
    * Half of the cheese mixture
    * Half of the turkey/rabe mixture
    * Eggplant slices
    * Sauce (I like to add some more garlic powder, oregano, and red pepper here)
    * Mushrooms
    * Zucchini slices
    * Remainder of turkey/rabe mixture
    * Lasagna noodles (or substitute with another layer of eggplant)
    * Remainder of sauce
    * Provolone cheese

8. Cover with foil and bake for 30 minutes.
9 Remove from oven, sprinkle on Parmesan, and cook for 20 minutes.

Delicious! And all those veggies will fill you up!

**Can be made ahead of time and frozen. Place lasagna in fridge to thaw overnight before serving.

Sunday, June 10, 2012

Powder Room Re-Do and Wall Stencil

Not surprisingly, in the middle of doing the giant stairway project, I was inspired by Pinterest to do a new project in the powder room.

DURING (useless towel rack)
BEFORE
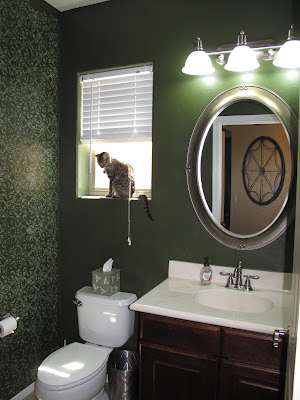
When we first moved in, every single wall in the house had been painted this chalky off-white color (Dover Cliffs or something like that). Boring. With the powder bath being a tiny space, I wanted to have fun with a strong color, and with my favorite color being green, I decided to go with a dark emerald color (Behr Forest Ridge). Initially I went with a semigloss, seen in the "During" picture, which was really shiny. But we lived with it for about a year.
Then I came across a framed mirror for $30 and was inspired to go back and re-do it all. First step, removing the builder-grade flat square of mirror. This is a two person job. We started off very cautiously, following instructions and taping the mirror to the wall in case it fell off on us. Hubby used wire to saw back and forth across the mastic while I held my hair dryer up to each mastic spot to loosen the glue. This was useless.

After about 20 minutes of no progress, hubby got out the crowbar and pried the mirror forward. Upside: the mirror was off the wall in about 5 minutes. Downside: the mirror took with it part of the  drywall.  Ha.

Well, while we're tearing holes in the walls, we might as well remove the useless towel rack that the builder installed on the opposite side of the room from the sink (it's bath towel-sized no less). I never understood why that towel rack was there.

Holes spackled and then sanded, it was time to repaint. I ended up going with the same color green, only this time got it in eggshell. Way better- it looks much richer when it doesn't reflect all the light. 

So how did Pinterest inspire me? I came across wall stencils. I'd thought about doing wallpaper in the bathroom but with textured walls that'd be a pain. Wall stencils looked doable. So on a whim I picked one out online and it arrived later that week. 

The pattern I picked was Victorian Baroque. It looks really cool. However, if I was to do this project again in the future, I would pick one with far less detail. Paint gummed up the tiny cutouts really quickly and it was a pain to clean.

Sticking the Stencil: I sprayed a light coat of Krylon Easy Tack on the back of the stencil. Do this in a well-ventilated area.

Paint: I used Behr Olivine latex paint. It might've been easier to clean if I'd used regular craft store acrylic paint.

Getting It Straight: 
The most important thing with a wall stencil is to get your first column straight. I held a level across the top of the stencil the first time I stuck it down to make sure it was horizontally straight. These stencils have register marks that line up in each corner as you go down, which made it easy to fit the pattern together (as long as you cleaned off the paint in each corner so you could see the marks).

Maneuvering Corners: 
The stencil was laser cut vinyl so it bent into corners pretty well. However, sometimes all those little cutout pieces didn't want to stick down which made it difficult. I used a small artist paint brush to fill in the missing swirls if I couldn't get the stencil to lay flat.

My original plan was to cover the entire bathroom with the stencil pattern. As I finished the large wall, which I loved, I thought the entire thing would be too busy. The other thing was that the stencil I'd been using was so gummed up by the end that it was impossible to clean and I'd have to order a second one. So, I decided to leave it at one wall.


Finished wall stencil

In spite of some of the hiccups, I really love how it turned out!

For the final touches, I hung the new mirror (love it!) and installed a hand towel rack next to the sink (practical, who'd have thunk?). I also painted the door and trim bright white (the next project will be to frame out the window and add crown molding).


Back to the stairs!


Tuesday, June 5, 2012

Magical Chocolate Flan Cake

This is not a healthy recipe. In fact, as part of the deal in making the cake for this particular office birthday, it couldn't be "any of that diet food" I eat. So I turned to a favorite recipe that was given to me by a coworker a few years ago (thanks Cynthia!).

With 8 whole eggs, 3 types of milk, cream cheese, chocolate cake, and caramel, this is definitely not diet food.


Ingredients:

* Box of Devil's Food chocolate cake mix and required ingredients
* 5 whole eggs
* 8 oz package of cream cheese, room temperature
* 1 tsp vanilla
* 12 oz can of evaporated milk
* can of sweetened condensed milk
* 1/2 cup fresh milk
* Jar of caramel

Directions: 

1. Preheat oven to 350F. Spray bundt pan with cooking spray. Cover bottom of pan with caramel.

 2. Mix chocolate cake according to instructions. Pour into cake pan over caramel.

3. In a blender, mix 5 eggs, cream cheese, vanilla, evaporated milk, condensed milk, and fresh milk.

4. Pour egg mixture over chocolate cake.

5. Place cake pan into large roasting/lasagna pan (at least 2" deep). You will need to cover the top of the cake with aluminum foil (spray the cake side with cooking spray so it doesn't stick). Tightly fold down the foil so your cake won't runneth over.

6. Place the roasting pan into the oven. Fill the roasting pan with hot water until the cake pan is sitting about 2" deep. This water bath will help heat the flan part of the cake evenly without burning.

7. Bake for 2 hours.

8. Remove from oven and let cool for 15-20 minutes.


9. Check that out!!! The chocolate is on top (or bottom) now!  Magic!  Place a platter on top of the bundt cake pan and carefully flip and remove the bundt cake shape. (Don't wait too long; I made the mistake once of leaving it in the pan in the fridge, thinking it would make it easier to transport, but instead the flan got stuck, ruining the presentation).


Voila! Your chocolate flan cake is done!  The cool thing is the flan, which was the last thing you poured into the pan, sinks through the chocolate cake mixture and ends up at the bottom (or top, once you flip it). All of that flan-ney goodness leaves you with really moist chocolate cake. And since it is SOOOO rich, it will feed a lot of people.


Sunday, June 3, 2012

Got scissors and a T-shirt? Make a workout tank!

I've overloaded my husband with home improvement projects from Pinterest, so I needed to find something that was on a smaller scale to satisfy my need to destroy/create.

Luckily I came across this project which required nothing but a T-shirt and scissors.


I cut off the neck, the sleeves,and the bottom seam (so you have a long skinny piece).

I cut the armholes deeper and a V-shape into the back. I also cut the shirt a little shorter so it would hang loosely.

Cut the seams off of the long skinny piece and then stretch it until it's really long. 

Wrap the skinny piece around the narrow part of the back, knot at each end and voila! A new workout tanktop! Took ten minutes.
So comfy!
Leftover material made a lovely ascot for Ralph.

I know what I'm doing with all those unused T-shirts in the closet!


Protein Ice Cream

When it's 100+ degrees day after day, I crave something cold. And sweet. And chocolate.


But ice cream isn't really diet food.

Fortunately my trainer told me how to make protein ice cream.

Basic recipe:
* 1 scoop flavored protein powder
* 1 tbsp of water
* Flavor extract if you want (I used raspberry)
* Optional - scoop of plain Greek yogurt


Don't put too much water in! Mix it all up in a little bowl and stick it in the freezer until it's the right consistency.

Google "protein ice cream" and you'll find lots of recipes - some with cottage cheese, yogurt, fruit, ricotta cheese, etc.

Mmm a delicious cold summer treat that's not cheating!

Enjoy!
Protein Ice Cream!