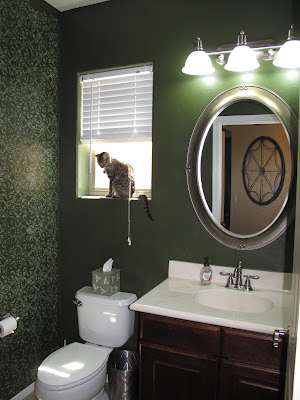
Not surprisingly, in the middle of doing the giant stairway project, I was inspired by Pinterest to do a new project in the powder room.
 |
| DURING (useless towel rack) |
 |
| BEFORE |
Then I came across a framed mirror for $30 and was inspired to go back and re-do it all. First step, removing the builder-grade flat square of mirror. This is a two person job. We started off very cautiously, following instructions and taping the mirror to the wall in case it fell off on us. Hubby used wire to saw back and forth across the mastic while I held my hair dryer up to each mastic spot to loosen the glue. This was useless.
Well, while we're tearing holes in the walls, we might as well remove the useless towel rack that the builder installed on the opposite side of the room from the sink (it's bath towel-sized no less). I never understood why that towel rack was there.
Holes spackled and then sanded, it was time to repaint. I ended up going with the same color green, only this time got it in eggshell. Way better- it looks much richer when it doesn't reflect all the light.
So how did Pinterest inspire me? I came across wall stencils. I'd thought about doing wallpaper in the bathroom but with textured walls that'd be a pain. Wall stencils looked doable. So on a whim I picked one out online and it arrived later that week.
.JPG) The pattern I picked was Victorian Baroque. It looks really cool. However, if I was to do this project again in the future, I would pick one with far less detail. Paint gummed up the tiny cutouts really quickly and it was a pain to clean.
The pattern I picked was Victorian Baroque. It looks really cool. However, if I was to do this project again in the future, I would pick one with far less detail. Paint gummed up the tiny cutouts really quickly and it was a pain to clean.Sticking the Stencil: I sprayed a light coat of Krylon Easy Tack on the back of the stencil. Do this in a well-ventilated area.
Paint: I used Behr Olivine latex paint. It might've been easier to clean if I'd used regular craft store acrylic paint.
Getting It Straight:
The most important thing with a wall stencil is to get your first column straight. I held a level across the top of the stencil the first time I stuck it down to make sure it was horizontally straight. These stencils have register marks that line up in each corner as you go down, which made it easy to fit the pattern together (as long as you cleaned off the paint in each corner so you could see the marks).
.JPG)
Maneuvering Corners:
The stencil was laser cut vinyl so it bent into corners pretty well. However, sometimes all those little cutout pieces didn't want to stick down which made it difficult. I used a small artist paint brush to fill in the missing swirls if I couldn't get the stencil to lay flat.
My original plan was to cover the entire bathroom with the stencil pattern. As I finished the large wall, which I loved, I thought the entire thing would be too busy. The other thing was that the stencil I'd been using was so gummed up by the end that it was impossible to clean and I'd have to order a second one. So, I decided to leave it at one wall.
 |
| Finished wall stencil |
In spite of some of the hiccups, I really love how it turned out!
For the final touches, I hung the new mirror (love it!) and installed a hand towel rack next to the sink (practical, who'd have thunk?). I also painted the door and trim bright white (the next project will be to frame out the window and add crown molding).
Back to the stairs!


I love this, and I really like the color. I also hate how the builder randomly stick towel racks in places that you can't reach. You should see our master one. There isn't a single towel rack close to the shower or the bathtub. Major fail.
ReplyDelete